5 Coveted Salon Techniques Your Stylist Uses — and How to Carry Them Home
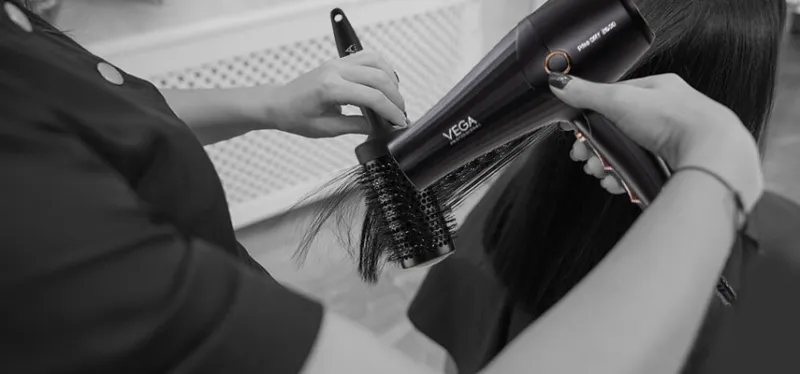
Photo: professional hairstylist blowout technique salon tools products, via breeze-media.vega.co.in
There is a particular frustration familiar to anyone who has walked out of a salon feeling flawless, only to attempt the same look at home three days later and fall dramatically short. The gap between professional results and at-home attempts is real — but it is far narrower than most people assume. The difference, more often than not, comes down to technique rather than talent.
At Belsi Salon, our stylists are trained in methods developed through years of professional education, product knowledge, and hands-on experience. While a skilled set of hands and a trained eye will always be the gold standard, many of the foundational principles behind our most requested services can be understood, adapted, and partially replicated between appointments.
Here, we decode five of the most impactful professional techniques — what they actually are, why they work, and how you can bring a version of each into your bathroom routine.
1. The Tension Blowout: Achieving Smoothness Through Controlled Stretch
What it is in the salon: When a stylist blow-dries your hair to a smooth, frizz-free finish, they are not simply pointing hot air at your head. They are applying consistent, directional tension to each section of hair while simultaneously directing heat in a downward motion along the cuticle. This cuticle-sealing technique is what produces that signature glossy, light-reflective result.
Why it works: Hair cuticles — the overlapping scales that coat each strand — lie flat when tension is applied downward and heat is directed from root to tip. Frizz occurs when cuticles are raised and irregular. Tension blowouts physically flatten the cuticle, locking in smoothness.
How to replicate it at home: Divide clean, towel-dried hair into four to six sections secured with clips. Work one section at a time, holding the hair taut with a round brush and directing your dryer nozzle downward along the shaft — never upward or sideways. Finish each section with a brief blast of cool air to set the cuticle. A high-quality ionic dryer will accelerate results significantly. For fine hair, try the T3 Featherweight or the Dyson Supersonic; for thick or coarse hair, a higher-wattage option with a concentrator attachment is essential.
2. Strategic Product Layering: Applying Products in the Right Order and Zone
What it is in the salon: Professional stylists rarely apply a single product uniformly from root to tip. Instead, they layer multiple products in a specific sequence, applying each to targeted zones of the hair. A heat protectant may go on mid-shaft to ends, while a volumizing mousse is worked only into the roots, and a finishing serum is used exclusively on the surface.
Why it works: Different areas of the hair have different needs. Roots require lift and grip; mid-lengths need moisture and protection; ends crave smoothing and shine. Applying the wrong product to the wrong zone — or piling everything on at once — creates heaviness, buildup, and inconsistent results.
How to replicate it at home: Before your next blowout, try this sequence: apply a thermal protectant to damp mid-lengths and ends, work a lightweight volumizing product into roots only, and save any smoothing or glossing product for the final step on dry hair. Less is almost always more — a dime-sized amount of each product is typically sufficient for medium-length hair.
3. Point Cutting: The Technique Behind Natural, Lived-In Texture
What it is in the salon: Rather than cutting straight across the hair shaft (a blunt cut), point cutting involves angling the shears vertically into the ends of the hair, removing weight selectively and creating a softer, more diffused edge. It is a finishing technique used by stylists to eliminate the "box" appearance that can result from blunt trimming.
Why it works: Point cutting disrupts the uniformity of the hair's edge, allowing strands to move more freely and blend more naturally. It is particularly effective for those with thick hair that tends to look heavy, or for anyone who wants to maintain length while reducing bulk.
How to replicate it at home: This one requires caution — we strongly recommend leaving significant cutting to your stylist. However, for minor dustings between appointments, you may carefully use sharp hair shears (never craft scissors) to point-cut your ends. Hold a small section of dry hair between two fingers, and snip into the ends at a 45-degree angle rather than cutting straight across. Work in very small increments, removing no more than a quarter-inch at a time.
4. The Scalp Prep Ritual: Why Cleansing Technique Changes Everything
What it is in the salon: A professional shampoo service is not simply about cleaning the hair — it is a structured scalp treatment. Stylists apply shampoo directly to the scalp (not the lengths), use the pads of the fingers (not the nails) in circular motions, and rinse with water pressure and temperature calibrated to fully remove product without stripping moisture.
Why it works: The scalp is skin, and like all skin, it benefits from consistent, gentle exfoliation and stimulation. Proper shampooing increases circulation to hair follicles, removes buildup that inhibits healthy growth, and prepares the scalp to absorb conditioning treatments more effectively.
How to replicate it at home: Emulsify your shampoo between your palms before application. Apply it directly to the scalp and massage in small, circular motions for a full 60 seconds — most people spend far less time than this. Rinse thoroughly, then apply conditioner exclusively to the mid-lengths and ends, keeping it away from the scalp entirely. Once a month, incorporate a clarifying shampoo or a scalp scrub (such as those from Briogeo or Ouai) to address any accumulated buildup.
5. The Gloss Finish: Recreating Salon Shine Between Color Appointments
What it is in the salon: Many salons offer in-salon gloss or toning treatments that deposit a thin layer of semi-permanent color or clear shine enhancement onto the hair shaft. These services refresh color vibrancy, neutralize brassiness, and add a luminous finish that lasts several weeks.
Why it works: Environmental exposure, heat styling, and regular washing gradually lift the hair's cuticle and dull its surface. A gloss treatment seals the cuticle, fills in microscopic surface irregularities, and restores light-reflective smoothness.
How to replicate it at home: At-home gloss options have improved dramatically in recent years. Products such as the John Frieda Colour Refreshing Gloss, the Kristin Ess Hair Gloss, or the dpHUE Gloss+ offer accessible, effective alternatives for maintenance between appointments. Apply to clean, damp hair, leave on for the directed time, and rinse. For those with color-treated hair, choose a shade-specific formula to maintain tone. Use every two to three weeks as needed.
Understanding the why behind professional techniques transforms the way you approach your own hair care — and deepens your appreciation for the expertise your stylist brings to every appointment. At Belsi Salon, we believe that an informed client is an empowered one. The more you know about the craft behind your service, the more you can protect and extend your investment between visits.
When in doubt, bring your questions to your next appointment. Our stylists are always glad to walk you through the techniques used in your service and recommend the at-home practices best suited to your specific hair type and goals.